Discover 6 incredible secrets about green anole eggs, from incubation to hatching. Expert tips for successful breeding, caring for eggs, and ensuring healthy hatchlings.
Table of Contents
Did you know that green anole eggs can determine their own sex based on temperature? This fascinating reptilian reproduction secret is just one of many incredible discoveries that make green anole breeding both challenging and rewarding for pet enthusiasts. Whether you’re a seasoned herpetologist or a curious pet owner who discovered mysterious white eggs in your anole’s terrarium, understanding the intricate world of green anole eggs opens up a universe of wonder that few reptile species can match.
Green anole eggs represent one of nature’s most remarkable examples of temperature-dependent development, where environmental conditions literally shape the future of these tiny creatures before they even hatch. From the moment a female anole deposits her precious cargo in the perfect hiding spot to the dramatic emergence of a fully-formed hatchling weeks later, every stage of this process holds secrets that can mean the difference between successful reproduction and heartbreaking loss.
When I first discovered two pristine white eggs buried in the moss of my anole terrarium in northern California, I had no idea I was about to embark on one of the most educational and nerve-wracking experiences of my reptile-keeping journey. Those 35 days of careful monitoring taught me that green anole eggs are far more complex and sensitive than I ever imagined, requiring precise environmental conditions and constant vigilance to achieve successful hatching.
Understanding Green Anole Reproduction Basics
Green anoles (Anolis carolinensis) follow a fascinating reproductive cycle that differs significantly from mammals and birds. These remarkable lizards reach sexual maturity at approximately 8-12 months of age, with successful breeding typically occurring during their active season from April through September in their native southeastern United States habitat.
Female green anoles possess the remarkable ability to store sperm for extended periods, meaning a single mating session can result in multiple fertile clutches over several weeks or months. This evolutionary adaptation ensures reproductive success even when males are scarce or environmental conditions are challenging.
The breeding process begins with elaborate courtship displays where males showcase their vibrant dewlaps, perform push-ups, and engage in territorial behaviors to attract females. Once mating occurs, females begin the crucial process of egg development, which requires significant energy and proper nutrition to produce viable green anole eggs.
Table 1 – Markdown Version:
| Development Stage | Duration | Temperature Range | Key Characteristics |
|---|---|---|---|
| Pre-laying | 7-14 days | 75-82°F | Egg formation in oviducts |
| Laying | 1-2 days | 78-85°F | Female seeks ideal nesting site |
| Early incubation | 1-15 days | 80-86°F | Cell division and basic organ formation |
| Mid-incubation | 16-25 days | 82-88°F | Sex determination and major development |
| Late incubation | 26-35 days | 80-85°F | Final development and preparation for hatching |
| Hatching | 1-3 days | 78-82°F | Breaking out of shell and first movements |
Secret 1: Temperature-Dependent Sex Determination
One of the most incredible secrets about green anole eggs lies in their unique ability to determine sex based purely on incubation temperature. This phenomenon, known as temperature-dependent sex determination (TSD), means that the thermal environment during a critical period of development literally decides whether a hatchling will be male or female.
Research conducted by the University of Georgia has shown that green anole eggs incubated at temperatures between 84-89°F typically produce males, while temperatures ranging from 78-83°F tend to produce females. The critical period for sex determination occurs between days 15-25 of incubation, making temperature control during this window absolutely crucial for breeders who want to influence their hatchling ratios.
This remarkable adaptation serves an important evolutionary purpose in wild populations. During cooler spring months, when food resources may be more abundant and competition lower, the production of females ensures future reproductive potential. Conversely, warmer summer temperatures produce males when territorial competition and breeding opportunities are at their peak.
For pet owners managing green anole eggs, understanding this temperature-sex relationship allows for strategic breeding programs. Many successful breeders maintain separate incubation chambers set at different temperatures to produce balanced male-to-female ratios or to specifically target one sex based on their breeding goals.
The precision required for sex determination highlights why professional-grade incubators with accurate thermostats are essential for serious green anole breeding. Even small temperature fluctuations during the critical determination period can result in unexpected sex ratios or developmental abnormalities.
Secret 2: The Perfect Nesting Environment
Creating the ideal environment for green anole eggs requires understanding the specific microhabitat conditions that female anoles seek in nature. Wild green anoles typically deposit their eggs in locations that provide consistent moisture, protection from predators, and stable temperatures throughout the incubation period.
The substrate choice for green anole eggs significantly impacts hatching success rates. Research indicates that a mixture of vermiculite and water at a 1:1 ratio by weight provides optimal moisture retention without becoming waterlogged. This specific moisture level, measured at approximately 80-85% humidity, prevents both desiccation and fungal growth that can destroy developing embryos.
Depth also plays a crucial role in successful egg development. Green anole eggs should be buried approximately 1-2 inches deep in the incubation medium, providing sufficient insulation while allowing for proper gas exchange. Too shallow, and the eggs risk desiccation; too deep, and oxygen levels may become insufficient for proper development.
Professional breeders often use specialized egg boxes constructed from plastic containers with ventilation holes drilled in specific patterns. These containers should be sized appropriately, with roughly 4-6 inches of depth and enough surface area to prevent overcrowding if multiple green anole eggs are incubated together.
The positioning of green anole eggs within the incubation medium requires careful attention to their original orientation. Once laid, eggs should never be rotated or flipped, as this can damage the developing embryo and air pocket essential for proper development. Marking the top of each egg with a pencil immediately after discovery helps maintain proper orientation throughout the incubation period.
Lighting conditions also influence successful egg development. While green anole eggs don’t require direct light exposure, maintaining a natural photoperiod in the incubation area can help regulate humidity levels and prevent extreme temperature fluctuations that might occur with constant artificial lighting.
Secret 3: Monitoring Egg Health and Development
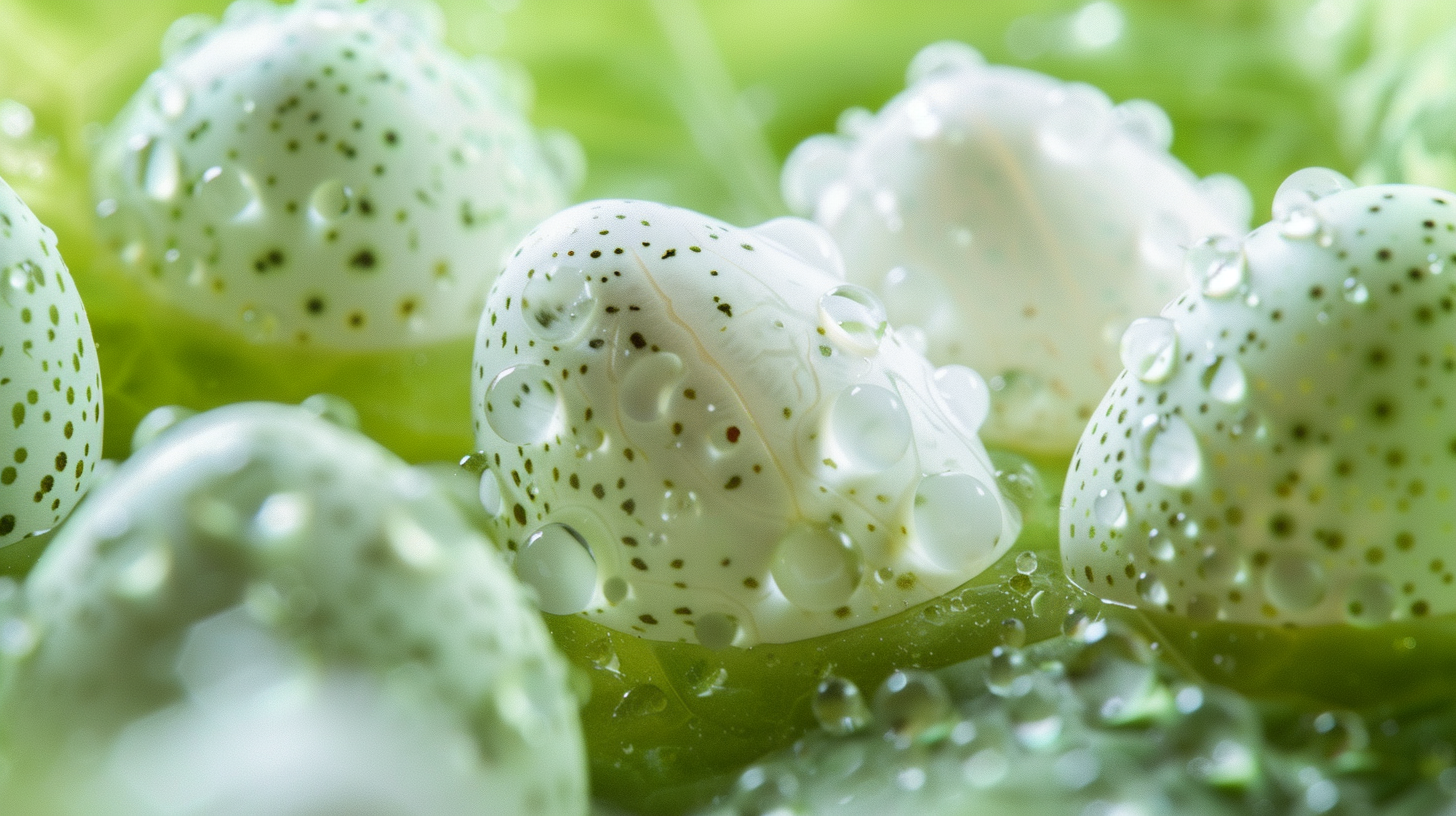
Successful green anole egg management requires understanding the visual and physical indicators that signal healthy development versus potential problems. Healthy green anole eggs maintain a chalky white appearance throughout most of the incubation period, with the shell remaining firm but slightly flexible to the touch.
One of the most reliable methods for monitoring egg health involves candling, a technique borrowed from poultry farming that uses bright light to illuminate the egg’s interior. Starting around day 10-14 of incubation, a small LED flashlight held against the shell reveals the developing blood vessel network and embryo outline inside healthy green anole eggs.
During candling sessions, healthy eggs display a clear network of red blood vessels spreading across the inner shell surface, with a dark central mass representing the developing embryo. As incubation progresses, this mass grows larger and more defined, eventually occupying most of the egg’s interior space by day 25-30.
Warning signs during candling include lack of blood vessel development after day 15, dark or cloudy areas within the egg contents, or red rings that may indicate bacterial infection. However, it’s important to limit candling sessions to once per week maximum, as excessive handling and light exposure can stress developing embryos.
The weight of green anole eggs provides another valuable health indicator. Healthy eggs typically lose 10-15% of their original weight during the incubation period due to natural water loss. Eggs that lose weight too rapidly may be experiencing excessive dehydration, while those that gain weight might indicate overhumidification or shell permeability issues.
Shell integrity throughout incubation offers additional clues about egg health. Small, natural indentations are normal and usually resolve as development progresses. However, deep cracks, soft spots, or areas of discoloration may signal problems requiring immediate attention or removal from the incubation environment.
Table 2 – Markdown Version:
| Week | Healthy Signs | Warning Signs | Action Required |
|---|---|---|---|
| Week 1 | Firm white shell, no odor | Soft spots, yellowing | Monitor closely, adjust humidity |
| Week 2 | Blood vessels visible when candled | No development visible | Continue incubation, recheck in 3 days |
| Week 3 | Embryo outline visible, steady weight | Dark patches, rapid weight loss | Evaluate incubation conditions |
| Week 4 | Movement may be visible, shell thinning | Mold growth, foul odor | Remove affected eggs immediately |
| Week 5 | Pip marks or small holes appearing | No pip after day 38 | Assist hatching if necessary |
Secret 4: The Critical Humidity Balance
Maintaining proper humidity levels represents one of the most challenging aspects of successfully incubating green anole eggs. Unlike many reptile species that tolerate wide humidity ranges, green anole eggs require precise moisture control throughout their development to prevent both desiccation and fungal contamination.
The ideal humidity range for green anole eggs falls between 80-85% relative humidity, measured using accurate digital hygrometers placed at egg level within the incubation container. This specific range provides sufficient moisture for proper shell membrane development while preventing the waterlogged conditions that promote harmful bacterial and fungal growth.
Humidity levels that drop below 75% for extended periods can cause egg shells to become too rigid, preventing normal expansion as the embryo grows. This condition, known as “shell-bound,” often results in failed hatching attempts or deformed hatchlings that cannot break free from their shells.
Conversely, humidity levels exceeding 90% create an environment where dangerous microorganisms thrive. Eggs exposed to excessive moisture often develop visible mold colonies on their shells, which can penetrate the shell and kill developing embryos. The characteristic black or green fuzzy growth on green anole eggs indicates immediate intervention is necessary.
Professional breeders often employ multiple humidity control strategies simultaneously. Water bowls placed within incubation containers provide baseline moisture, while ventilation holes allow for air circulation that prevents stagnation. Some advanced setups include automated misting systems that maintain consistent humidity without creating pooled water that could drown eggs.
Seasonal adjustments to humidity management become necessary as external environmental conditions change. During winter months when indoor heating systems reduce ambient humidity, additional water sources may be required. Summer conditions with high natural humidity might necessitate increased ventilation to prevent oversaturation.
The substrate’s moisture content directly impacts local humidity around green anole eggs. Vermiculite mixed at the proper 1:1 water ratio by weight naturally maintains appropriate humidity levels. However, this mixture should be checked monthly and adjusted as needed, as both evaporation and absorption can alter its moisture content over time.
For more expert pet care tips and product recommendations, visit BlithePet.com — your trusted source for pet wellness.
Secret 5: Recognizing Pre-Hatching Behaviors
The days leading up to hatching reveal fascinating behaviors and physical changes in green anole eggs that indicate imminent emergence. Understanding these pre-hatching signals allows pet owners to prepare appropriate environments for newborn hatchlings and intervene if assistance becomes necessary.
Approximately 2-3 days before hatching, green anole eggs begin showing subtle movement patterns as the fully developed embryo positions itself for emergence. These movements appear as gentle rolling or shifting motions when eggs are gently touched or when the incubation container is carefully moved. However, excessive handling should be avoided during this critical period.
The “pipping” process marks the beginning of active hatching behavior. Pipping occurs when the hatchling uses its specialized egg tooth to create the first small hole in the shell, usually appearing as a tiny circular opening roughly 2-3mm in diameter. This initial breakthrough allows the hatchling to begin breathing air directly rather than relying solely on oxygen exchange through the shell membrane.
Sound provides another indicator of imminent hatching. Careful listening near green anole eggs during the final days of incubation may reveal faint scratching or tapping sounds as hatchlings move and begin working against their shell walls. These sounds are subtle but become more pronounced as hatching approaches.
Shell appearance changes significantly during the final week of incubation. The previously opaque white shell often develops a slightly translucent quality, and small indentations or “windows” may appear where the shell has thinned. These changes result from the hatchling absorbing calcium from the shell to strengthen its own developing skeletal system.
Weight changes accelerate during pre-hatching stages as hatchlings absorb the remaining yolk sac that has sustained their development. Green anole eggs may lose an additional 5-10% of their weight during the final week, with this loss concentrated in the last 48-72 hours before emergence.
Positioning within the incubation substrate also provides clues about hatching timing. Eggs that have remained stable throughout incubation may shift slightly as hatchlings become more active. This movement results from increased internal pressure as the hatchling grows to fill the entire shell space.
Secret 6: The Hatching Process and Immediate Care
The actual hatching process for green anole eggs represents the culmination of weeks of careful incubation and presents unique challenges that require immediate attention from pet owners. Understanding the normal hatching timeline and potential complications ensures the best possible outcomes for newborn anoles.
Normal hatching for green anole eggs occurs over a period of 12-48 hours from initial pipping to complete emergence. After creating the first small hole, hatchlings typically rest for several hours while their circulatory and respiratory systems complete the transition from egg-dependent to independent function. This resting period is crucial and should not be interrupted unless clear signs of distress are present.
The “zipping” process follows the initial pip, where hatchlings create a series of connected holes around the circumference of the egg. This circular cutting pattern allows the top portion of the shell to separate, creating an opening large enough for the hatchling to emerge. Healthy green anole hatchlings complete this process independently without human intervention.
Size expectations for newly hatched green anoles help owners prepare appropriate housing and feeding programs. Hatchlings typically measure 3.5-4 inches in total length, with roughly half of this length consisting of their tail. Their coloration may differ significantly from adult anoles, often displaying brown or gray patterns that provide better camouflage during their vulnerable early weeks.
Immediate post-hatching care requires understanding that newborn anoles retain some egg yolk in their abdominal cavity, providing energy for the first 24-48 hours of life. During this period, hatchlings should not be offered food, as their digestive systems are not yet ready to process external nutrition. Instead, they should be provided with a humid, secure environment where they can rest and complete their developmental transition.
Environmental requirements for newly hatched green anoles differ from adult specifications. Temperature should be maintained at 78-82°F with humidity levels of 85-90% during the first week. A shallow water dish with clean, dechlorinated water should be available, but the dish must be shallow enough to prevent drowning accidents.
Housing for green anole hatchlings requires smaller enclosures than adult setups to ensure easy access to food and water. A 10-gallon aquarium provides adequate space for 2-3 hatchlings, with numerous hiding spots and climbing opportunities. Live or artificial plants create a sense of security while maintaining the high humidity levels essential for proper skin shedding.
Table 3 – Markdown Version:
| Hatching Stage | Timeline | Normal Behavior | Intervention Needed |
|---|---|---|---|
| Initial Pip | Hours 0-6 | Small hole appears, minimal movement | None – allow natural progression |
| Rest Period | Hours 6-18 | No visible activity, internal development | Monitor for breathing through pip hole |
| Zipping | Hours 18-30 | Circular cutting around egg | Assist only if no progress after 36 hours |
| Emergence | Hours 30-48 | Head and shoulders appear first | Help remove shell pieces if stuck |
| First Movement | Hours 48-72 | Exploration of immediate area | Provide hiding spots and shallow water |
| First Feeding | Days 2-4 | Active hunting behavior begins | Offer small insects after yolk absorption |
Expert Tips for Successful Green Anole Egg Management
Successfully managing green anole eggs from laying to hatching requires attention to numerous details that can significantly impact outcomes. These expert tips, developed through years of breeding experience and scientific research, provide practical guidance for both novice and experienced reptile keepers.
Tip 1: Record Keeping Excellence – Maintain detailed records for each clutch of green anole eggs, including laying date, incubation temperature, humidity levels, and development milestones. This information becomes invaluable for future breeding efforts and helps identify patterns that lead to successful hatching.
Tip 2: Multiple Incubation Setups – Experienced breeders often maintain separate incubation environments for different temperature requirements. This strategy allows for sex ratio control and provides backup options if one incubator experiences mechanical failure.
Tip 3: Substrate Preparation – Pre-mix incubation substrate several days before needed, allowing moisture levels to stabilize throughout the medium. Fresh vermiculite-water mixtures may have uneven moisture distribution that can affect egg development.
Tip 4: Minimal Disturbance Protocols – Limit egg inspections to once weekly maximum during the first three weeks of incubation. Excessive handling during early development stages increases stress and mortality rates significantly.
Tip 5: Emergency Response Planning – Develop contingency plans for power outages, equipment failures, and extreme weather events that could affect incubation conditions. Backup heating elements and battery-powered monitoring devices can save entire clutches during emergencies.
Tip 6: Fungal Prevention Strategies – Include small amounts of sphagnum moss in incubation containers to naturally inhibit fungal growth. This moss contains compounds that suppress harmful microorganisms without affecting egg development.
Tip 7: Assisted Hatching Techniques – Learn proper assisted hatching procedures before they’re needed. Hatchlings that fail to progress after 48 hours from initial pipping may require careful shell removal to prevent death from exhaustion.
Tip 8: Quarantine Protocols – Isolate newly hatched anoles for at least two weeks before introducing them to existing populations. This quarantine period allows for health assessment and prevents disease transmission.
Tip 9: Nutrition During Breeding – Ensure breeding females receive optimal nutrition, including calcium supplementation, for at least 30 days before expected laying. Poor maternal nutrition directly affects egg quality and hatchling viability.
Tip 10: Genetic Diversity Management – Maintain breeding records to prevent inbreeding and promote genetic diversity in captive populations. Outcrossing with unrelated bloodlines every few generations improves overall health and reproductive success.
Common Mistakes to Avoid with Green Anole Eggs
Pet owners and breeders frequently make preventable mistakes when managing green anole eggs that result in reduced hatching success or hatchling mortality. Understanding these common errors and their solutions helps ensure better outcomes for breeding programs.
Mistake 1: Temperature Fluctuations – Many beginners use inadequate heating equipment that allows significant temperature swings throughout the incubation period. Green anole eggs require stable temperatures within 2-3°F of target ranges. Invest in quality thermostats and redundant heating systems to maintain consistency.
Mistake 2: Inappropriate Substrate Ratios – Using incorrect vermiculite-to-water ratios creates either overly dry or waterlogged conditions. The proper 1:1 ratio by weight ensures optimal moisture retention without creating anaerobic conditions that promote harmful bacteria.
Mistake 3: Overcrowding Incubation Containers – Placing too many green anole eggs in a single container leads to uneven temperature distribution and increased disease transmission risk. Allow at least 2 inches of space between eggs and use multiple containers when necessary.
Mistake 4: Premature Candling – Attempting to candle eggs before day 10-14 of incubation provides little useful information and may damage developing embryos. Early candling can disrupt critical cellular development processes.
Mistake 5: Ignoring Ventilation Requirements – Sealed incubation containers without proper air exchange create carbon dioxide buildup and oxygen depletion. Drill appropriate ventilation holes or use containers with breathable lids to ensure adequate gas exchange.
Mistake 6: Fertilization Assumptions – Assuming all white eggs are fertile leads to wasted incubation time and resources. Infertile eggs remain unchanged during candling and should be removed after 2-3 weeks to prevent contamination of viable eggs.
Mistake 7: Rushing Hatchling Assistance – Intervening too early in the hatching process often causes more harm than good. Hatchlings that receive premature assistance may suffer from incomplete yolk absorption or underdeveloped circulatory systems.
Mistake 8: Inadequate Sanitation – Failing to maintain clean incubation environments allows pathogenic organisms to proliferate. Regular cleaning of containers, fresh substrate changes, and removal of failed eggs prevents disease outbreaks.
Warning Signs That Require Immediate Attention
Recognizing critical warning signs during green anole egg incubation can mean the difference between successful hatching and complete clutch loss. These red flags require immediate evaluation and often emergency intervention to save developing embryos.
Rapid Shell Softening – Eggs that become noticeably softer within 24-48 hours often indicate bacterial infection or extreme overhumidification. Remove affected eggs immediately and adjust environmental conditions to prevent spread to healthy eggs.
Foul Odors – Any unpleasant smell emanating from incubation containers signals decomposition or bacterial growth. Investigate immediately, remove compromised eggs, and sanitize the entire incubation setup before continuing.
Visible Mold Growth – Black, green, or white fuzzy growth on egg shells indicates fungal contamination that can quickly spread throughout an incubation container. Remove affected eggs and improve ventilation to prevent recurrence.
Complete Lack of Development – Eggs showing no blood vessel development after three weeks of proper incubation are likely infertile or contain dead embryos. Remove these eggs to prevent contamination of viable specimens.
Excessive Weight Loss – Eggs losing more than 20% of their original weight indicate severe dehydration that threatens embryo survival. Increase humidity levels gradually and monitor closely for improvement.
Abnormal Shell Coloration – Yellowing, browning, or dark patches on previously white shells often indicate internal problems or infection. Candle these eggs immediately to assess embryo viability.
Delayed Hatching – Eggs that show no pipping activity after 38-40 days may contain hatchlings in distress. Careful assessment and possible assisted hatching may be necessary to prevent loss.
When to Consult a Reptile Veterinarian
Certain situations involving green anole eggs exceed the scope of typical pet owner management and require professional veterinary expertise. Recognizing when to seek professional help ensures the best possible outcomes for both eggs and hatchlings.
Complex Egg-Binding Issues – Female anoles showing signs of egg-binding, such as prolonged straining, lethargy, or visible eggs through the abdominal wall, require immediate veterinary intervention. Delayed treatment can result in serious complications or death.
Suspected Infectious Diseases – Recurring egg failures, unusual shell abnormalities, or multiple hatchling deaths suggest possible infectious diseases that require laboratory diagnosis and treatment protocols beyond home management capabilities.
Genetic Abnormalities – Hatchlings displaying severe deformities, neurological symptoms, or failure to thrive may have genetic conditions requiring professional evaluation. Veterinary assessment helps determine treatment options and breeding program adjustments.
Assisted Hatching Complications – Hatchlings requiring assisted hatching that develop bleeding, appear weak, or show signs of infection need professional medical attention. Veterinarians can provide appropriate antibiotics and supportive care.
Nutritional Deficiencies – Persistent egg quality problems, shell abnormalities, or poor hatchling development may indicate nutritional deficiencies in breeding adults that require professional dietary assessment and supplementation programs.
Advanced Reproductive Management – Breeders seeking to implement advanced techniques such as artificial incubation optimization, genetic diversity programs, or disease prevention protocols benefit from veterinary consultation and ongoing professional guidance.
Professional reptile veterinarians possess specialized knowledge of green anole reproduction, access to diagnostic equipment, and experience with complex cases that exceed typical pet owner capabilities. Establishing relationships with qualified reptile veterinarians before problems arise ensures rapid access to expert care when needed.
Myth-Busting: Separating Fact from Fiction
Several persistent myths surrounding green anole eggs continue to circulate among pet owners and even some inexperienced breeders. Debunking these misconceptions with scientific facts helps ensure better outcomes for breeding programs and prevents unnecessary losses.
Myth 1: Green Anole Eggs Must Be Rotated During Incubation – This dangerous myth stems from poultry keeping practices and can kill developing anole embryos. Unlike bird eggs, reptile eggs develop a fixed orientation that cannot be changed once laid. Rotating green anole eggs disrupts the air pocket and developing embryo, often resulting in death.
Myth 2: Fertile Eggs Are Always Perfectly Round – Egg shape varies naturally and does not indicate fertility status. Some perfectly fertile green anole eggs may appear slightly oval or asymmetrical due to factors such as female age, nutrition, or oviduct conditions. Only candling or incubation can determine fertility status.
Myth 3: Eggs Can Be Saved from Any Temperature Extreme – While green anole eggs show some resilience to brief temperature fluctuations, exposure to temperatures below 70°F or above 95°F for more than a few hours typically results in embryo death. Some damage from temperature extremes is irreversible regardless of subsequent care.
Myth 4: Adding Calcium Directly to Incubation Substrate Helps Development – This practice can actually harm developing embryos by altering substrate pH and potentially creating chemical burns on egg shells. Proper maternal nutrition before laying provides all necessary calcium for healthy development.
Myth 5: Green Anole Eggs Need Daily Misting – Direct water application to egg shells can promote bacterial growth and interfere with normal gas exchange. Proper humidity levels should be maintained through substrate moisture and ambient humidity control, not direct misting of eggs.
Research conducted by herpetological societies and university reptile programs consistently demonstrates that natural incubation conditions produce the best outcomes for green anole eggs. These scientific findings should guide breeding practices rather than anecdotal recommendations or traditions borrowed from other species.
Step-by-Step Guide to Setting Up Incubation
Creating the perfect incubation environment for green anole eggs requires systematic preparation and attention to detail. This comprehensive guide provides specific instructions for establishing and maintaining optimal conditions throughout the incubation period.
Step 1: Equipment Selection and Preparation – Choose an appropriately sized incubator or create a DIY setup using plastic containers with secure lids. Commercial reptile incubators offer precise temperature control, while homemade setups using aquarium heaters and thermostats provide budget-friendly alternatives. Ensure all equipment is thoroughly cleaned and tested before use.
Step 2: Substrate Preparation – Mix vermiculite with distilled water at a 1:1 ratio by weight, not volume. Weigh components separately to ensure accuracy. The finished mixture should hold together when squeezed but not drip water. Allow the mixture to sit for 24 hours before use to ensure even moisture distribution.
Step 3: Container Setup – Place 2-3 inches of prepared substrate in clean plastic containers with secure, ventilated lids. Create small ventilation holes using a heated nail or drill bit, spacing holes approximately 2 inches apart around the container perimeter. Avoid holes in the lid directly above where eggs will be placed.
Step 4: Temperature Stabilization – Set up heating elements and allow the incubation environment to stabilize for 48-72 hours before adding eggs. Monitor temperatures continuously using accurate digital thermometers placed at egg level. Adjust heating elements as needed to maintain target temperatures within 1-2°F.
Step 5: Humidity Calibration – Place calibrated hygrometers at egg level and monitor humidity readings for 24 hours. Adjust ventilation holes or add water bowls as needed to achieve 80-85% relative humidity. Document successful settings for future reference.
Step 6: Egg Placement – Gently place green anole eggs in prepared substrate, maintaining their original orientation. Create small depressions for each egg to prevent rolling. Space eggs at least 1 inch apart to allow for expansion and easy monitoring. Mark the top of each egg with a soft pencil.
Step 7: Monitoring Protocol – Establish regular monitoring schedules, checking temperatures and humidity daily while limiting egg disturbance to weekly visual inspections. Record all observations in a detailed logbook, noting any changes in egg appearance, environmental conditions, or equipment performance.
Step 8: Maintenance Routine – Perform weekly maintenance including temperature calibration checks, humidity adjustments, and substrate moisture evaluation. Remove any eggs showing signs of failure to prevent contamination. Clean and sanitize equipment monthly or as needed to maintain optimal hygiene.
FAQ Section :
Conclusion: Success with Green Anole Egg Management
Successfully managing green anole eggs from laying through hatching represents one of the most rewarding aspects of reptile keeping. The six incredible secrets revealed in this comprehensive guide – temperature-dependent sex determination, optimal nesting environments, health monitoring techniques, critical humidity balance, pre-hatching recognition, and proper hatching procedures – provide the foundation for successful breeding programs.
The journey of green anole reproduction showcases nature’s remarkable adaptability and precision. From the moment a female selects the perfect laying site to the dramatic emergence of a fully-formed hatchling, every stage demands respect for the intricate biological processes at work. Pet owners who embrace these complexities and commit to providing optimal care consistently achieve higher hatching success rates and healthier offspring.
Environmental control remains the cornerstone of successful green anole egg management. Temperature precision, humidity balance, and substrate quality directly impact every aspect of development from initial cell division through final emergence. The investment in proper equipment and monitoring systems pays dividends in improved outcomes and reduced stress for both eggs and caretakers.
The importance of patience cannot be overstated when working with green anole eggs. Natural processes unfold according to their own timeline, and attempts to rush or shortcut development often result in failure. Successful breeders learn to trust the process while remaining vigilant for signs that intervention may be necessary.
Documentation and record-keeping emerge as valuable tools for improving breeding success over time. Tracking environmental conditions, development milestones, and outcomes creates a database of information that guides future efforts and helps identify patterns that lead to optimal results.
Have you discovered green anole eggs in your terrarium, or are you planning to breed these fascinating reptiles? The secrets shared in this guide provide the roadmap for success, but remember that each clutch presents unique challenges and learning opportunities. The combination of scientific knowledge, careful observation, and dedicated care creates the ideal environment for bringing new life into the world.
For the most current information on reptile care, breeding techniques, and health management, consulting with experienced reptile veterinarians and established breeding communities provides ongoing support for your green anole endeavors. The reptile keeping community offers valuable resources and shared experiences that enhance individual success stories.
Have a similar experience with your pet? Share it in the comments below! Don’t forget to check out our other helpful guides at BlithePet.com.