Discover 3 practical DIY pet feeding station projects to reduce mess and improve your pet’s dining experience. Step-by-step guides, expert tips, and customization ideas included!
Table of Contents
Practical Solutions for Pet Parents
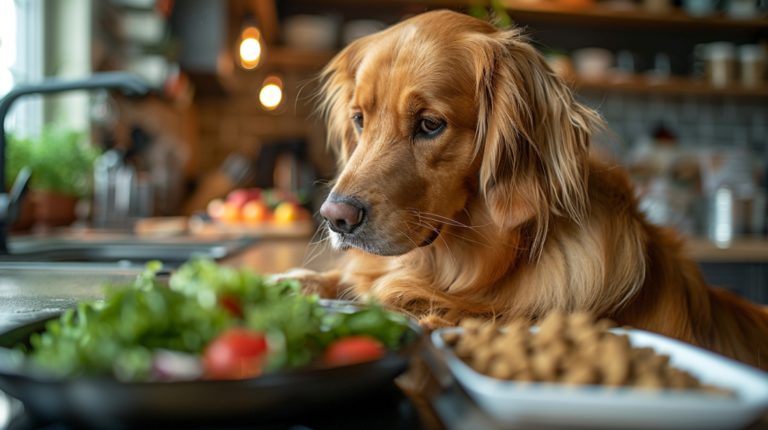
Are you tired of stepping in spilled water or finding kibble scattered across your kitchen floor? Creating a DIY pet feeding station might be the perfect solution for you and your furry friend. These customized feeding areas not only keep your home tidier but can also improve your pet’s dining experience. In this comprehensive guide, we’ll explore three amazing DIY pet feeding station projects that combine functionality, style, and pet-friendly design to enhance mealtime for your beloved companions.
Why Create a DIY Pet Feeding Station?
Before diving into specific projects, let’s understand why a dedicated feeding station makes sense for both pets and their owners:
Benefits for Pet Parents
A well-designed DIY pet feeding station offers numerous advantages:
- Reduces Mess: Containing food and water spills in one designated area makes cleanup easier
- Saves Space: Organized feeding stations maximize floor space efficiency
- Matches Your Décor: Custom designs complement your home’s aesthetic
- Saves Money: DIY options cost significantly less than store-bought alternatives
- Adjustable Height: Custom height reduces strain on your pet’s neck and joints
According to a 2023 survey by the American Pet Products Association, 67% of pet owners reported less food waste and cleaner floors after implementing a dedicated feeding station.
Benefits for Pets
Your furry friends will appreciate:
- Comfortable Eating Position: Proper height reduces digestive issues and neck strain
- Stress-Free Dining: A consistent, dedicated feeding area creates security
- Less Competition: Separated feeding areas reduce food guarding in multi-pet households
- Enhanced Hydration: Convenient water access increases consumption
- Mental Stimulation: Interactive feeding stations can provide enrichment
Dr. Sarah Williams, veterinary nutritionist, notes: “Proper feeding station height can significantly reduce the risk of bloat in large-breed dogs by promoting better posture during meals.
Essential Considerations Before Building
Before grabbing your tools, consider these important factors:
Size and Height Requirements
Proper dimensions matter for your pet’s health and comfort:
For Dogs:
- Small breeds (under 15 lbs): 3-6 inches from floor to bowl rim
- Medium breeds (15-30 lbs): 7-11 inches from floor to bowl rim
- Large breeds (30+ lbs): 12-16 inches from floor to bowl rim
For Cats:
- Most cats: 5-8 inches from floor to bowl rim
- Senior cats: Slightly lower for easier access
Material Safety
Choose pet-safe materials:
- Avoid: Treated lumber, lead-based paints, toxic adhesives
- Recommended: Food-grade stainless steel bowls, non-toxic paints and sealants, untreated hardwoods
Space Planning
Consider:
- Location with minimal foot traffic
- Distance from walls (at least 6 inches)
- Proximity to water sources for easy refills
- Away from electrical outlets and cords
- Distance from litter boxes (for cats)
With these considerations in mind, let’s explore three fantastic DIY pet feeding station projects suitable for different skill levels and needs.
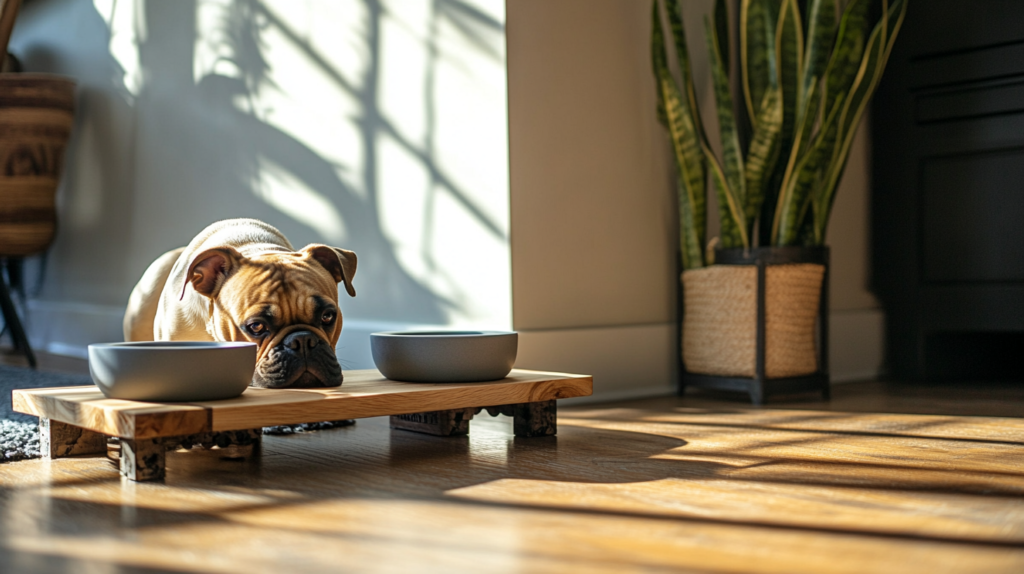
Project 1: Elevated Wooden Pet Feeding Station
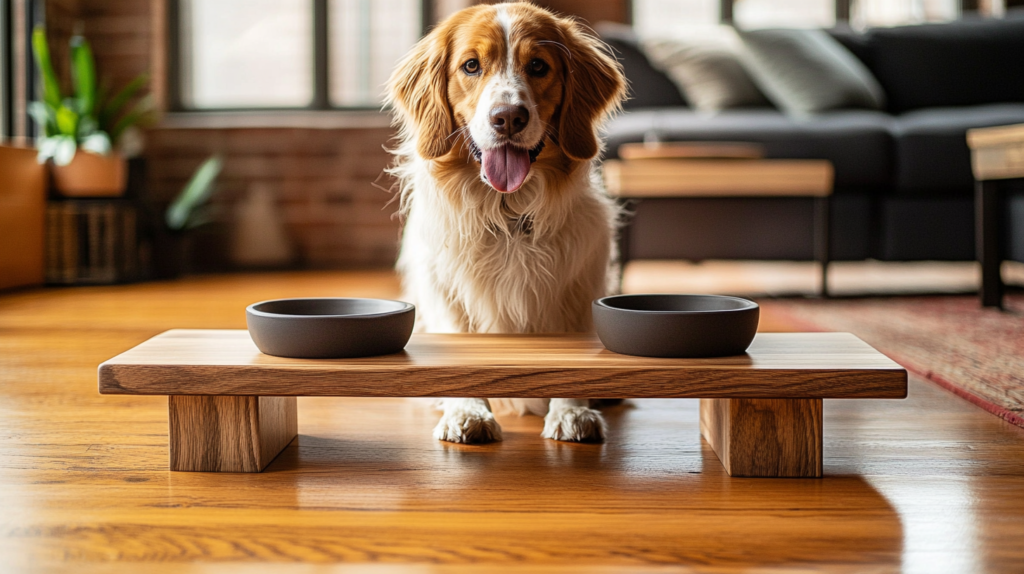
This classic design creates an elevated platform that promotes better posture while adding style to your home.
Materials Needed
- 4 wooden boards (¾-inch thickness recommended)
- 2 for the top: 24″ × 12″
- 2 for the sides: 12″ × (desired height)
- Electric drill with bits
- Wood screws (1½ inch)
- Sandpaper (medium and fine grit)
- Wood stain or non-toxic paint
- Polyurethane sealant (food-safe)
- Hole saw (sized to match your pet bowls)
- 2 stainless steel pet bowls with rims
- Measuring tape
- Pencil
- Safety equipment (goggles, gloves)
Step-by-Step Instructions
- Measure and Cut the Wood
- Cut wood to dimensions listed above
- Sand all pieces thoroughly with medium grit, then finish with fine grit
- Create Bowl Holes
- Measure and mark the centers for your bowl holes on the top piece
- For most arrangements, keep holes 6-8 inches apart
- Use hole saw to cut openings slightly smaller than the bowl rim diameter
- Test fit your bowls to ensure they sit securely without falling through
- Assemble the Frame
- Place side pieces perpendicular to the bottom piece
- Pre-drill holes to prevent wood splitting
- Secure side pieces to bottom using wood screws
- Attach top piece to the side pieces
- Sand and Finish
- Sand all edges and corners smooth
- Apply wood stain or non-toxic paint in desired color
- Allow to dry completely (24 hours recommended)
- Apply 2-3 coats of food-safe polyurethane sealant
- Allow 72 hours to fully cure before use
- Install Bowls
- Insert bowls into the prepared holes
- Ensure they fit snugly with rims resting on the wood surface
Customization Options
- Add Storage: Incorporate a drawer beneath for storing food or treats
- Include Name: Personalize with your pet’s name using wood burning or painted lettering
- Anti-Slip Base: Add rubber feet to prevent sliding on hard floors
- Water-Resistant Finish: Apply extra sealant for water bowl areas
This project typically costs $30-50 in materials and takes 3-4 hours to complete, plus drying time.
Project 2: Repurposed Furniture Pet Feeding Station
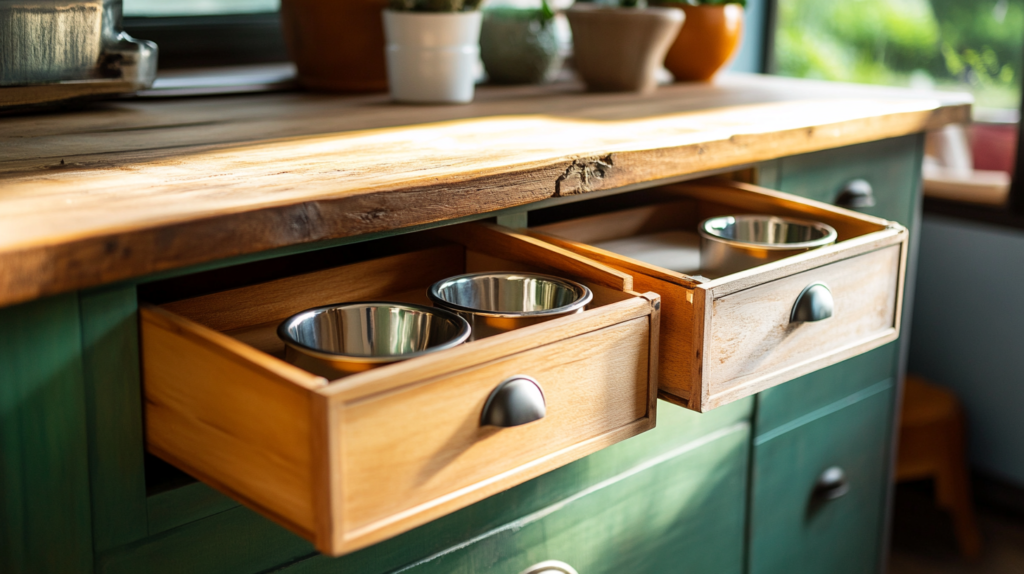
Transform an old piece of furniture into a functional feeding station with built-in storage.
Materials Needed
- Small dresser, nightstand, or end table
- Jigsaw or hole saw
- Sandpaper (various grits)
- Paint or stain (pet-safe)
- Polyurethane sealant
- Stainless steel pet bowls
- Measuring tape and pencil
- Optional: new hardware/drawer pulls
- Optional: contact paper for drawer lining
Step-by-Step Instructions
- Select and Prepare Furniture
- Choose a piece with appropriate height for your pet
- Remove any drawers and hardware
- Clean thoroughly and sand surfaces
- Create Bowl Openings
- Measure and mark the top surface for bowl placement
- Drill starter holes for the jigsaw or use a hole saw
- Cut openings slightly smaller than bowl rims
- Refinish the Piece
- Sand any rough edges around the new openings
- Apply pet-safe paint or stain
- Allow to dry completely
- Apply 2-3 coats of polyurethane sealant for water resistance
- Organize Storage Space
- Line drawers with water-resistant contact paper
- Designate spaces for food, treats, and accessories
- Replace or update hardware if desired
- Final Assembly
- Reinsert drawers
- Install pet bowls into openings
- Position in your chosen feeding area
Best Furniture Pieces to Repurpose
- Nightstands: Perfect height for medium dogs
- End Tables: Often ideal for larger dogs
- Small Dressers: Offer maximum storage capacity
- Vintage Sewing Machine Tables: Already have cut-outs that can be adapted
- Children’s Desks: Good height for small to medium pets
According to interior designer Rachel Thompson: “Repurposing furniture for pet feeding stations has become increasingly popular. It reduces landfill waste while creating functional, personalized pet furniture that blends seamlessly with home décor.”
Storage Ideas
- Top Drawer: Store dry food in airtight containers
- Middle Drawer: Keep treats, medications, and supplements
- Bottom Drawer: Store extra bowls, placemats, and cleaning supplies
Cost varies depending on whether you use existing furniture or purchase second-hand ($0-75), plus about $20 for supplies. The project typically takes 4-5 hours plus drying time.
Project 3: Space-Saving Wall-Mounted Feeding Station
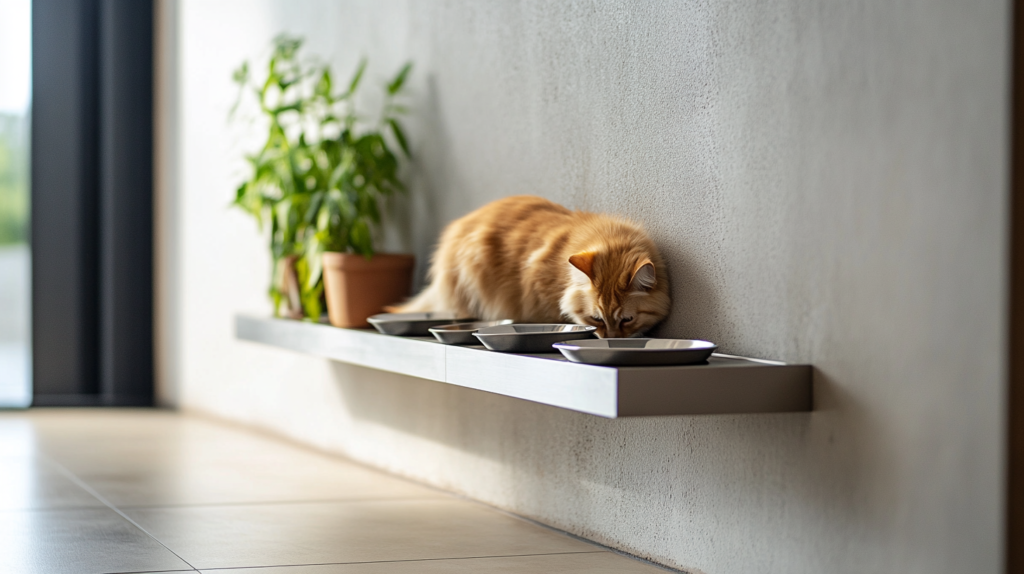
Perfect for small spaces, this wall-mounted design keeps floors clear while providing a dedicated feeding area.
Materials Needed
- 1″ × 12″ wood board (24-36″ length)
- 2-3 heavy-duty wall brackets and screws
- 2 stainless steel pet bowls
- Hole saw or jigsaw
- Drill with bits
- Stud finder
- Level
- Sandpaper
- Paint or stain (pet-safe)
- Polyurethane sealant
- Measuring tape and pencil
- Optional: small hooks for hanging leashes/accessories
Step-by-Step Instructions
- Prepare the Wood
- Cut board to desired length (typically 24-36″)
- Sand all surfaces and edges smooth
- Measure and mark locations for bowl holes
- Create Bowl Openings
- Use hole saw or jigsaw to cut openings
- Sand the cut edges thoroughly
- Test fit bowls to ensure proper placement
- Finish the Wood
- Apply pet-safe stain or paint
- Let dry completely
- Apply 2-3 coats of polyurethane sealant for durability
- Allow to cure for 48-72 hours
- Install Wall Brackets
- Use stud finder to locate wall studs
- Mark bracket positions at appropriate height for your pet
- Ensure bracket placement is level
- Attach brackets securely to wall studs
- Mount the Shelf
- Secure shelf to installed brackets
- Verify stability and levelness
- Insert feeding bowls into openings
Height Considerations
For wall-mounted stations, height is particularly crucial:
- For Dogs: Measure from floor to your dog’s shoulder, then subtract 6 inches
- For Cats: Typically 8-10 inches from floor is comfortable
- For Senior Pets: Consider slightly lower heights for easier access
Wall Protection Ideas
To protect walls from splashes and spills:
- Install a backsplash using peel-and-stick tiles
- Apply several extra coats of water-resistant sealant
- Mount a clear acrylic sheet behind the feeding area
- Use a silicone mat with raised edges beneath the station
This project typically costs $25-40 in materials and takes 2-3 hours to complete, plus drying time.
Additional Feeding Station Accessories
Enhance your DIY pet feeding station with these practical additions:
Spill-Proof Mats
Containing mess is essential for keeping your floors clean:
- Silicone Mats: Waterproof with raised edges to contain spills
- Microfiber Mats: Highly absorbent for water drips
- PVC Mats: Durable and easy to clean
- Personalized Mats: Custom-printed with your pet’s name
Food Storage Solutions
Keep pet food fresh and accessible:
- Built-In Containers: Integrate food storage into your feeding station
- Airtight Dispensers: Allow portion control while maintaining freshness
- Labeled Containers: Especially useful for homes with multiple pets or special diets
Cleaning Supplies Station
For quick cleanup:
- Hooks for Towels: Install small hooks nearby for cleaning cloths
- Brush and Dustpan: A small handheld set works well for kibble spills
- Spray Bottle: Fill with equal parts vinegar and water for safe cleaning
Making Your Feeding Station Pet-Friendly
Beyond the basic construction, consider these factors to make your feeding station truly pet-friendly:
Anti-Slip Features
Prevent sliding bowls and stations:
- Apply rubber feet to the bottom of raised stations
- Use non-skid shelf liner under bowls
- Consider rubber-bottomed bowls for additional stability
Joint-Friendly Access
Especially important for senior pets or those with mobility issues:
- Create gradual access with small steps for elevated stations
- Ensure edges are rounded and smooth
- Provide adequate space for comfortable positioning during meals
Multi-Pet Considerations
For households with multiple animals:
- Visual Barriers: Simple dividers between feeding areas reduce competition
- Color Coding: Different colored bowls can help identify which belongs to each pet
- Spacing: Allow at least 3 feet between feeding stations for multiple pets
Maintenance and Cleaning Tips
Keep your DIY pet feeding station in top condition:
Daily Maintenance
- Wipe surfaces after meals
- Wash bowls with hot, soapy water
- Check for food debris in corners or crevices
Weekly Deep Cleaning
- Remove bowls and wipe all surfaces thoroughly
- Apply pet-safe disinfectant to feeding surfaces
- Check for any damage that might need repair
- Wash and thoroughly dry any mats or placemats
Quarterly Inspection
- Check for wear and tear on all components
- Re-seal wooden surfaces if needed
- Tighten any loose screws or fittings
- Assess if height adjustments are needed as puppies grow
According to a study in the Journal of Veterinary Behavior, regularly cleaned feeding stations significantly reduce the risk of bacterial contamination that can cause pet illness.
Common Mistakes to Avoid
Learn from others’ experiences by avoiding these common pitfalls:
Construction Errors
- Improper Measurements: Always measure twice, cut once
- Inadequate Sealing: Water damage is the most common issue with wooden stations
- Insufficient Bracing: Ensure elevated stations can support the weight of filled water bowls
- Sharp Edges: Thoroughly sand all surfaces that pets might contact
Design Miscalculations
- Inconvenient Location: Placing stations in high-traffic areas leads to accidents
- Incompatible Heights: A station too high or low can cause discomfort and health issues
- Insufficient Spill Containment: Water spills are inevitable; plan accordingly
- Inadequate Bowl Sizing: Bowls too small lead to more frequent refills and potential overflow
Eco-Friendly Options
For environmentally conscious pet owners:
Sustainable Materials
- Reclaimed Wood: Salvaged lumber adds character while reducing waste
- Bamboo: Fast-growing and naturally water-resistant
- Cork: Renewable and naturally antimicrobial
Upcycled Elements
- Repurposed Pipes: Copper or PVC pipes can create modern stand designs
- Old Cutting Boards: Food-safe and already sealed for water resistance
- Wine Crates: Perfect size for small to medium pets
Themed Feeding Station Ideas
Add personality to your project with these themed concepts:
Rustic Farmhouse
- Distressed wood finish
- Metal accents or brackets
- Mason jar storage for treats
- Chalkboard area for feeding notes
Modern Minimalist
- Clean lines with hidden hardware
- Neutral colors
- Integrated into existing cabinetry
- Multi-functional design
Vintage Inspired
- Repurposed antique furniture
- Classic hardware details
- Decorative legs or feet
- Antiqued finish techniques
FAQ Section
How high should my pet’s feeding station be?
The ideal height allows your pet to eat without bending their neck up or down excessively. For dogs, measure from floor to their shoulder and subtract 6 inches. For cats, 5-8 inches from the floor is typically comfortable. Senior pets may benefit from slightly lower heights for easier access.
What materials are safe to use around pet food?
Food-grade stainless steel bowls are recommended. For the structure, use untreated hardwoods, food-safe sealants, and non-toxic paints. Avoid pressure-treated lumber, lead-based paints, and toxic adhesives that could contaminate food areas.
How do I prevent my dog from making a mess around the feeding station?
Use a feeding station with raised edges or add a spill-proof mat with a lip around the perimeter. For especially messy eaters, consider a feeding station with a backsplash or one that partially encloses the eating area. Slow-feeder bowls can also reduce splashing and spilling.
Should cats and dogs have separate feeding stations?
Yes, in multi-pet households, it’s best to create separate feeding stations. Dogs and cats have different eating styles and nutritional needs. Separation reduces stress and prevents food stealing. Place cat feeding stations where dogs can’t access them, such as on counters or shelves that only cats can reach.
How often should I clean my pet’s feeding station?
Bowls should be washed daily with hot, soapy water. The feeding station surface should be wiped down after each meal and disinfected weekly with pet-safe cleaners. Mats should be washed or thoroughly cleaned at least weekly.
Can I build an automated feeding station for my pets?
Yes, you can incorporate automatic feeders into your DIY station design. However, automatic feeders work best for dry food and are most appropriate for healthy adult pets on regular feeding schedules. Always consult with your veterinarian before implementing an automatic feeding system.
Ready to Upgrade Your Pet’s Dining Experience?
For more expert pet care tips and product recommendations, visit BlithePet.com — your trusted source for pet wellness. Our team of pet care specialists is dedicated to helping you create the best environment for your furry family members.
Conclusion
Creating a DIY pet feeding station is more than just a home improvement project—it’s an investment in your pet’s health and your home’s cleanliness. Whether you choose the classic elevated design, repurpose existing furniture, or save space with a wall-mounted solution, a custom feeding station can be tailored to meet both your pet’s needs and your aesthetic preferences.
Remember that the perfect feeding station takes into account your pet’s size, age, and physical condition. Regular maintenance ensures your creation remains safe and hygienic for years to come. With minimal investment and moderate DIY skills, you can create a feeding station that enhances mealtime for your beloved companion.
Have a similar experience with your pet? Share it in the comments below!